In order to properly clean and/or maintain a Hi Power, partial disassembly of the pistol (also known as fieldstripping) is required. I use the term “properly clean,” because I’ve heard a story regarding members of a certain European embassy security detail that would fire in excess of 1,000 rounds through its issued Hi Power pistols and would purposely avoid field stripping them for cleaning. Instead, the personnel opted to clean the pistols bullseye style: in which they would simply remove the magazine, lock the slide rearward, clean the barrel with multiple bore brushes and patches until the barrels were nearly clean and use a brush to remove any fouling from around the breechface and behind the extractor.
Eventually, members of the security detail began noticing cracks forming in the slides of their pistols. When the problem became quite prevalent, the powers-that-be authorized a Browning Hi Power certified armorer (an acquaintance of mine) to be called in to determine the source of the problem. It turns out the damage stemmed from the security detail’s cleaning habits—or lack thereof: By choosing to not periodically fieldstrip their Hi Powers and subject them to a detailed cleaning, excess carbon buildup formed around the barrel lugs and the corresponding recesses in the slide, which subsequently had nowhere to go. Such neglect, no matter how benign it might have seemed at the time, ultimately lead to the pistols being damaged beyond repair and requiring eventual replacement. The moral of the story: While simplified bullseye cleaning practices are OK on occasion, it should only be done to satisfy one’s short-term needs, such as until you get home from the range, whereupon you can give the pistol the detailed cleaning your Hi Power deserves. Pistols fired extensively, several hundred rounds for example, require field stripping and a thorough cleaning. Fortunately, doing so is super simple.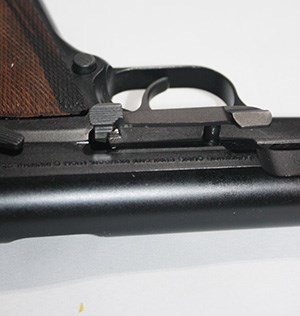
- Begin by removing the magazine and triple-checking the pistol’s empty via tactile and visual inspection.
- Next, lock the slide rearward as far as it will go while simultaneously actuating the thumb safety so it engages the rear-most notch in the left side of the slide.
- Push the slide-release lever upward and simultaneously outward from the right side of the frame. Doing so will expose the part’s shaft and permit you remove the slide-release lever and set it aside.
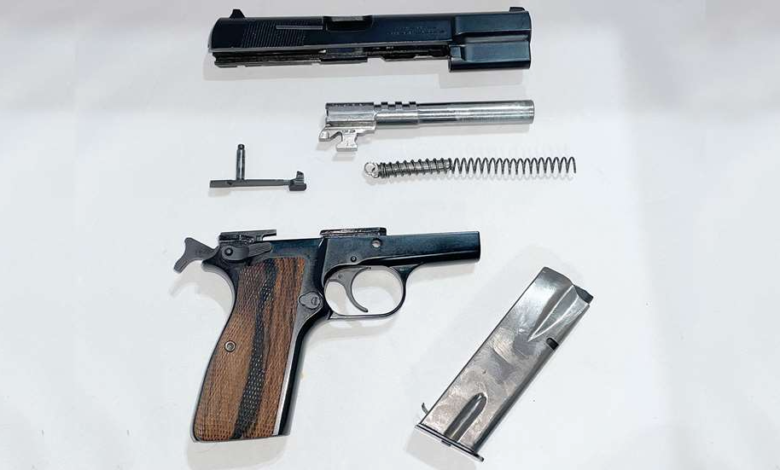
- Now, lower the thumb safety while maintaining control of the slide, which is still under tension from the recoil spring. Carefully release the slide while maintaining your grip of it throughout while easing the slide and barrel assembly forward off the frame. With the frame and slide separate, set the frame aside. While either placing the slide upside down on the workbench or holding inverted in your hand, grasp the recoil-spring guide with your other hand and slightly push it forward and upward to uncapture it from the lug on the of the barrel before slowing removing it and the recoil spring. (Take time to note the orientation of the recoil-spring guide beforehand, so you’ll know its proper orientation when it’s time for reassembly—as it is possible to replace it upside down, which can unintentionally damage your pistol.)
- Finally, while grasping the barrel by its bottom-most lug, pull it slightly forward (or out of battery), thereby exposing the barrel’s muzzle slightly beyond the end of the slide while simultaneously lifting the barrel and removing it rearward from the slide to complete the fieldstrip process.
- To reassembly the pistol, simply reverse the process. Once the recoil-spring is compressed and the thumb safety is engaged locking the slide rearward, the pistol goes back together easily. (Just make sure the recoil-spring guide assembly is oriented in the proper direction., lest you risk unintentionally damaging your pistol.)
Having successfully fieldstripped your Hi Power, its major components are now accessible for basic and maintenance. More importantly however, at this stage you are one step closer to beginning the customization phase of your build.
In the next installment, we’ll cover completely disassembling both the frame and slide assemblies of your pistol so that you can have a completely blank canvas from which to work.